¶ Creating/Editing Objects
To create a new object go to the Administration>Manage menu and choose Object Manager from the list.
Push the  button(you can find it on the toolbar) for the Edit Object dialog to appear.
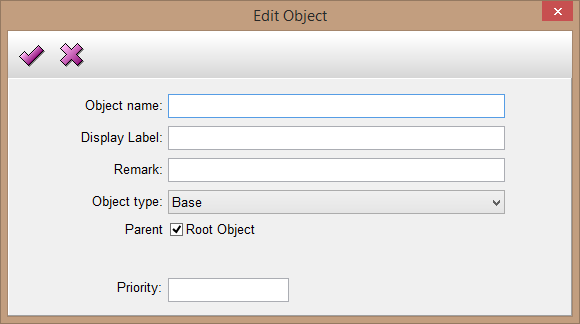
To create an object, follow the forthcoming steps.
1. Type the name you want to give to your object in the Object name field.
Be careful of the name conventions!
The Object name is the only field in the Edit Objects dialog which must be filled out.
2. When your tree is displayed on the left side of your screen, each part will bear the name entered previously to the Display Label.
This can be anything, you can even neglect the name conventions (you can use spaces, puctuation marks and accentuated letters as well).
If you leave the field empty, the information appearing in the Display Label will be the same as in the field of the Object name.
3. To select the Object type, click on the combo box and choose from the list.
4.a. If you decide that your object is going to be a parent in your tree, than mark the small box near Parent.

4.b. If you want your object to become a subordinate root in your tree, click on the small arrow under the Root Object strip
and choose a parent for your object.

4.c. If your tree is too diversified to make a decision about the attachement, a click on the wand can help in visualisation.
Click on the  to open Select Object Dialog .
The button opens a dialog with your existing tree.

5. To finalize your work, click on the  button in the right upper corner of the initial Edit Object dialog.
6. If you managed to follow the procedure your tree is going to appear in the left part of the window. By clicking on its parts, you can read relating informations, you can modify them and you can also delete them by clicking on the  button.
Be careful, if you delete an object, all its subordinate elements will disappear.
Note that creating a new object is also possible with the popup menu in the object tree view.