¶ CIPIW IIS SETUP
To use cockpit within an isapi dll, you are going to need an installed IIS server with ISAPI extension role enabled.
¶ Creating an Application Pool for your ISAPI Application
Once you have all the pre-requisites installed, it is time to install the ISAPI application. We start creating a new application pool for the ISAPI application. It is a good idea to create one application pool per application. Doing this, you can stop/update/start an ISAPI application without interfering with other installed applications.
Below the tree root, select Application Pools and then Add Application Pool: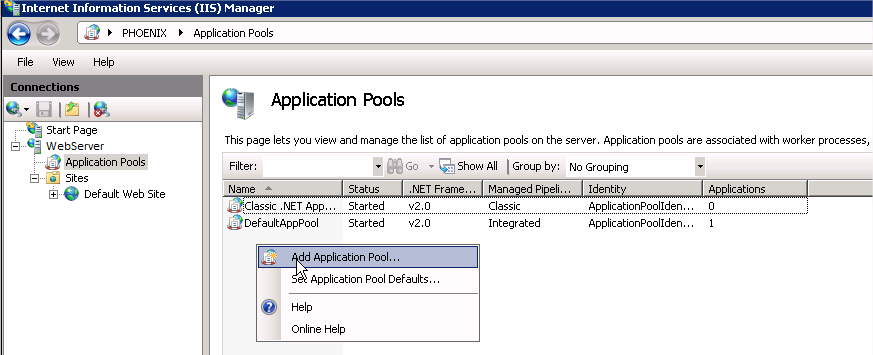
Give a name for your application pool (in our case ISAPI App Pool), select No Managed Code and click on OK button: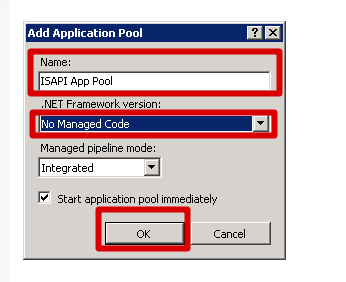
Now let's configure its advanced settings. Right click on the new application pool and choose Advanced Settings: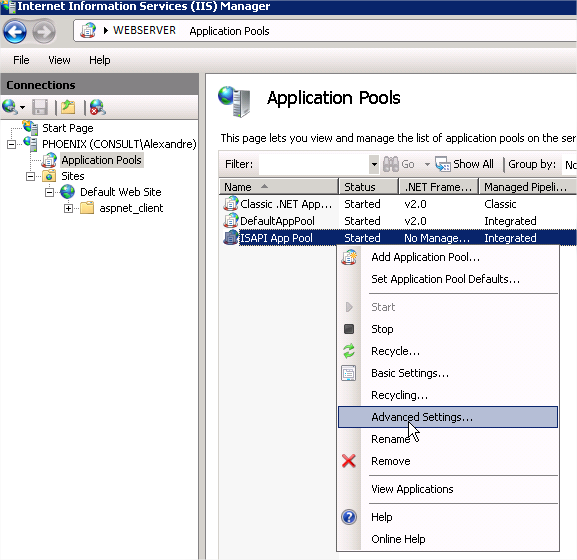
In order to support 32-bit application on 64-bit Windows you must set Enable 32-bit Applications to True. Also, select the Identity of your application pool and set it to a custom account. Personally, I always create a new user for the application pool and give it all the required priviledges. If your your application requires access to other protected network resources (like other application servers, database servers, etc.) you should consider using a domain user with all the necessary priviledges. If you have full control over this web server, it is easier if you add the user to the Local Administrators group. This way, security restrictions won't affect the process. Once the application is running, you can remove the user from Local Administrators group and give it only the requires permissions.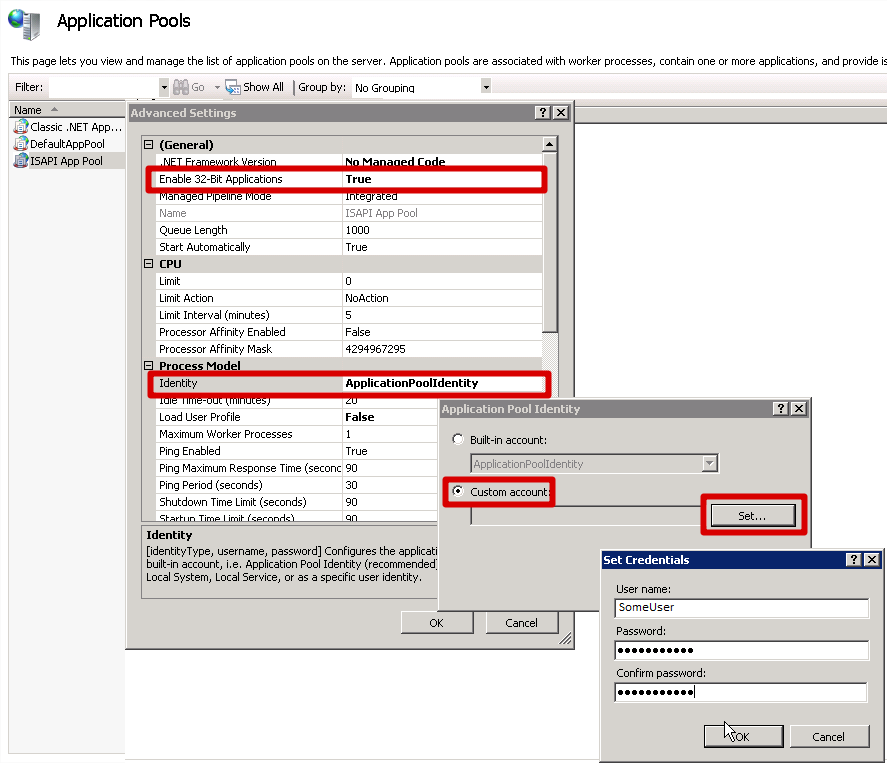
¶ Creating a new application in IIS
Now that we have a new application pool for our new ISAPI application, is time to create the application under IIS. Right click the Default Web Site (you may also create it under a differente web site) and choose Add Application: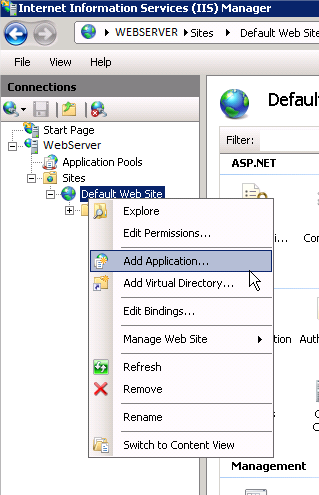
Select the application pool that you created on step 2 and the physical path, where your ISAPI DLL will be installed. Also, click on "Connect as..." button and set a specific user for the application. Again, personally, I always set the same user created for the application pool, because I want all the settings to be explicit.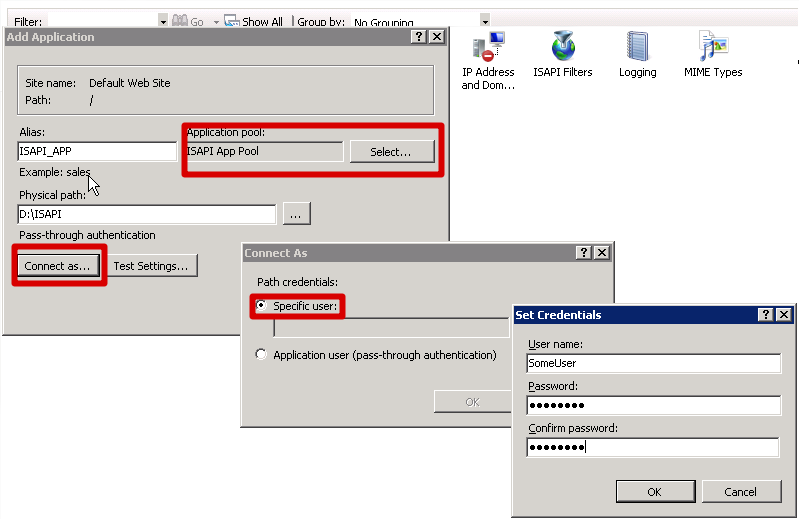
Once the user is set, click no the button "Test Settings...". It must succeed. If not, check the NTFS permissions of the user on the physical path selected.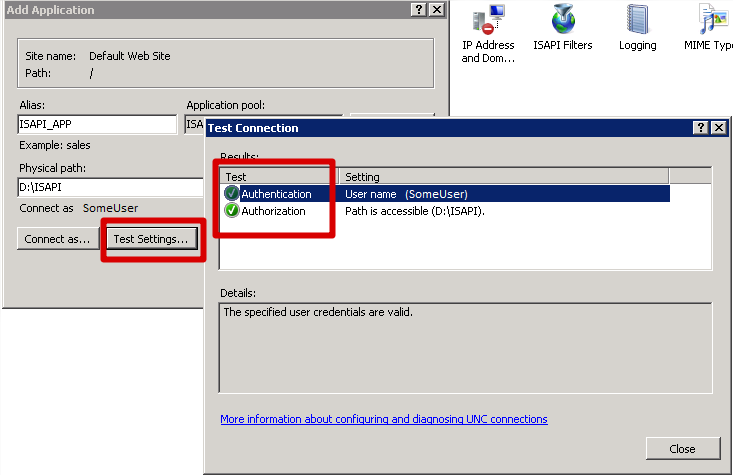
¶ Enabling ISAPI Modules in IIS
Even though you installed ISAPI support, it is disabled by default. You have to enable ISAPI on IIS before testing your application.
Select your newly created application and then double-click on the "Handler Mappings" icon: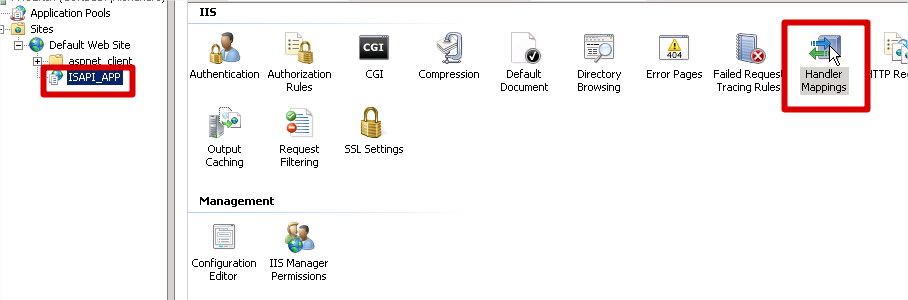
Note that CGI-exe and ISAPI-dll are disabled. To enable them, click on the link "Edit Feature Permissions...":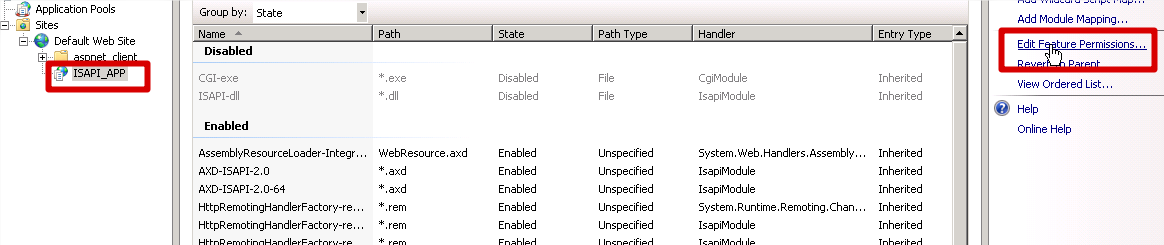
Check the "Execute" check box and click on OK button: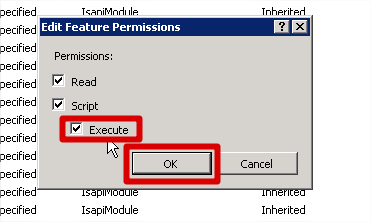
A final step to enable ISAPI on this web server is remove the ISAPI and CGI restrictions. Select the root node and double-click on the "ISAPI and CGI Restrictions" icon: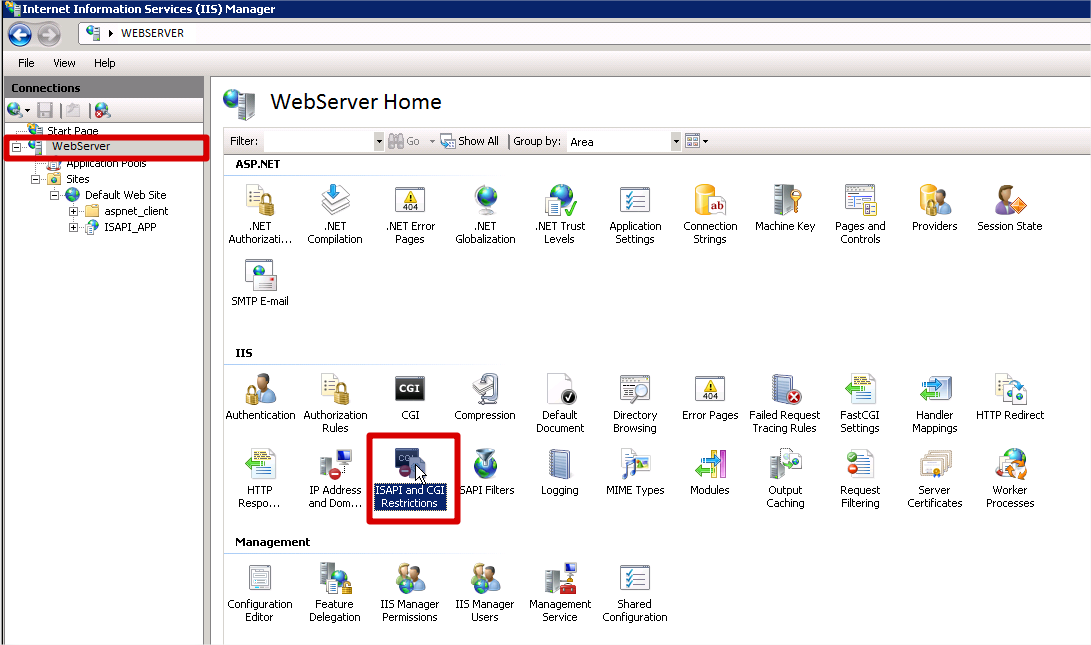
Click on the link "Edit Feature Settings...":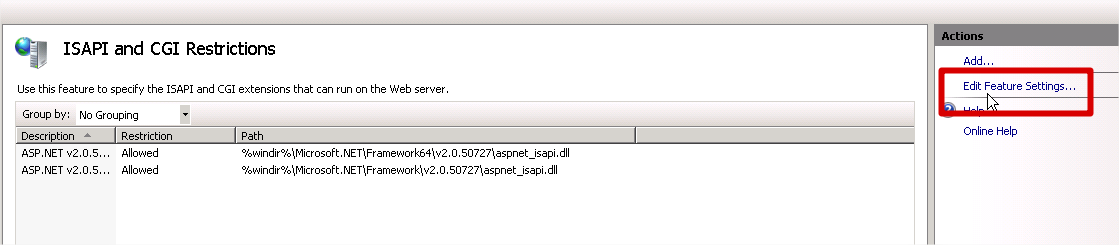
Mark both check boxes and click on OK button: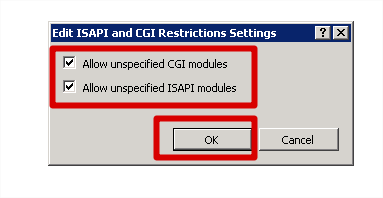
¶ Windows Authentication
Installing windows authentication for IIS.
1. On the taskbar, click Server Manager.
2. In Server Manager, click the Manage menu, and then click Add Roles and Features.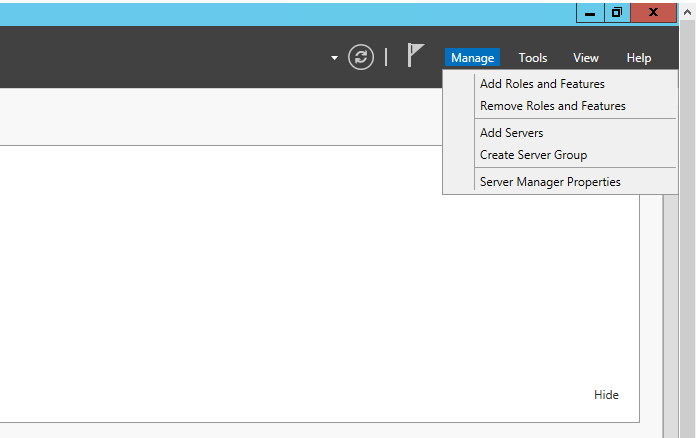
In the Add Roles and Features wizard, click Next. Select the installation type and click Next. Select the destination server and click Next.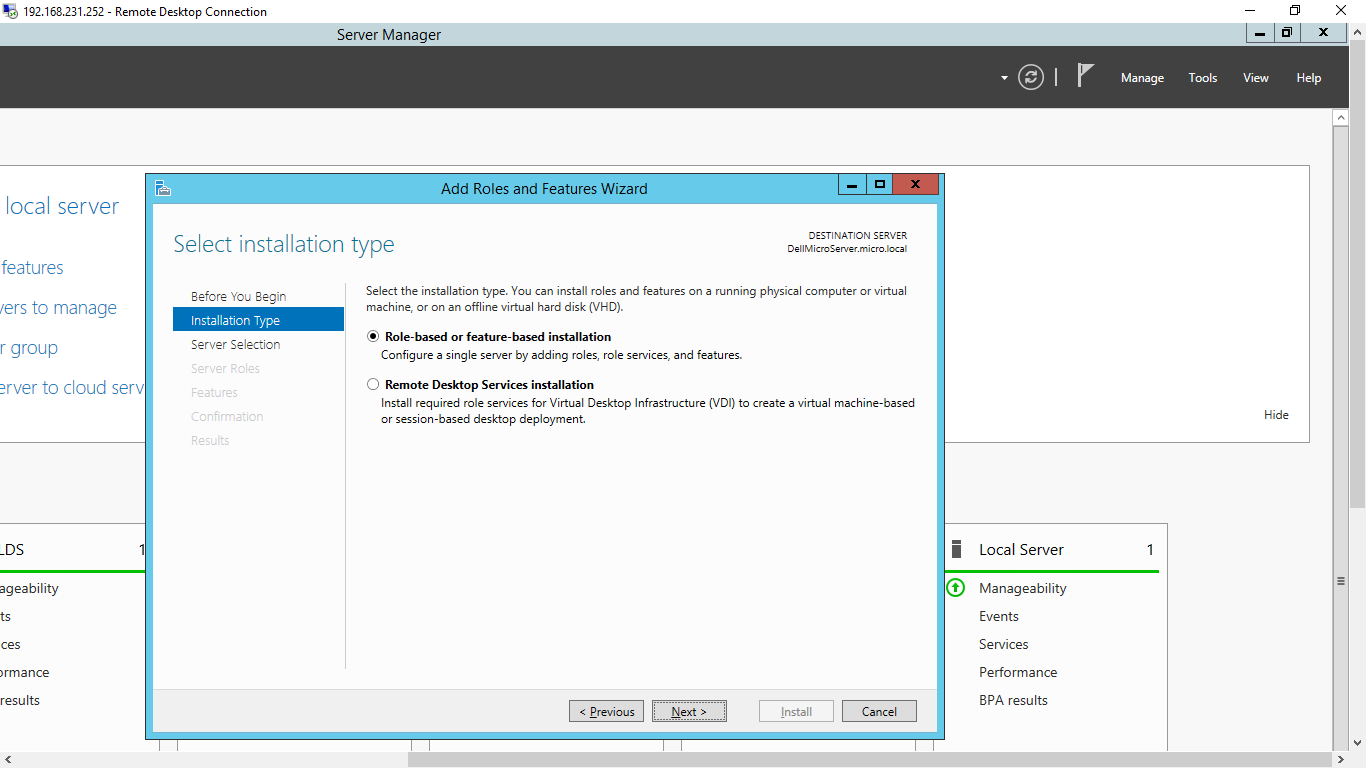
On the Server Roles page, expand Web Server (IIS), expand Web Server, expand Security, and then select Windows Authentication. Click Next.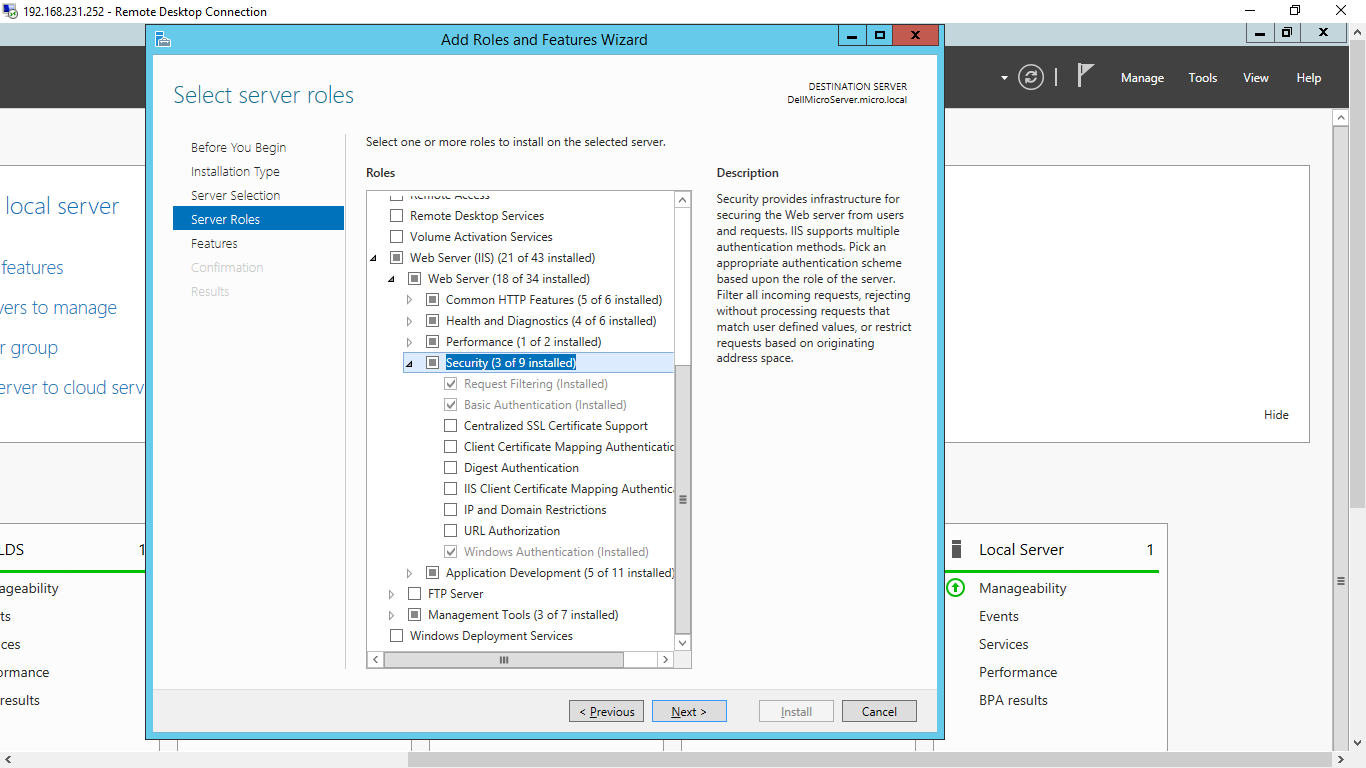
On the Select features page, click Next.
On the Confirm installation selections page, click Install.
On the Results page, click Close.
¶ HOW TO ENABLE WINDOWS AUTHENTICATION WebCockpit
- The user must have the right authentication type: ADS Based/ADS Group Based.
- The login type of the isapi application must be ldap auto login. You can set this via the config dialog of the webcockpit.
- You must set the IIS application to use windows authentication only!
¶ Configuring windows authentication for IIS:
Open Internet Information Services (IIS) Manager.
In the Connections panel, expand the server name, expand Sites, and then the site, application, or Web service for which you want to enable Windows authentication.
Scroll to the Security section in the Home pane, and then double-click Authentication.
In the Authentication pane, select Windows Authentication, and then click Enable in the Actions pane. 
Configuring the webservice:
If you have issues with the user group authentication, you just probably have to set the DOMAIN parameter in the ini file.
The correct value can be returned by the CIP_GetDomain function.
Links:
http://docs.atozed.com/docs.dll/deployment/isapi/Deploying%20ISAPI%20using%20IIS.html
https://www.iis.net/configreference/system.webserver/security/authentication/windowsauthentication
Disabling Application Recycle:
Disable Idle timeouts. 20 minutes of inactivity = boom! New process on the next incoming request. Set that to zero.
Disable Regular time interval - the 29 hour default has been described as "insane", "annoying" and "clever" by various parties. Actually, only two of those are true.
Optionally Turn on DisallowRotationOnConfigChange (above, Disable Reycling for configuration changes) if you just can't stop playing with it - this allows you to change any app pool setting without it instantly signaling to the worker processes that it needs to be killed. You need to manually recycle the App Pool to get the settings to take effect, which lets you pre-set settings and then use a change window to apply them via your recycle process.
As a general principle, leave pinging enabled. That's your safety net. I've seen people turn it off, and then the site hangs indefinitely sometimes, leading to panic... so if the settings are too aggressive for your apparently-very-very-slow-to-respond app, back them off a bit and see what you get, rather than turning it off. (Unless you've got auto-crash-mode dumping set up for hung W3WPs through your own monitoring process)